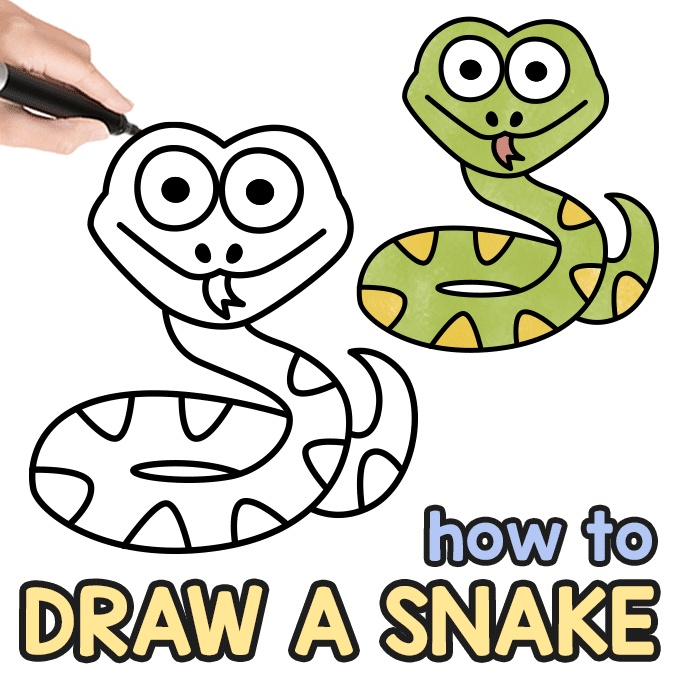
Learning how to draw a snake is easier than you might think! With our simple step-by-step tutorial, you’ll be drawing your very own serpent friend in no time.
Perfect for kids and beginners, this easy-to-follow guide breaks down the snake drawing process into manageable steps that anyone can master.

*This post contains affiliate links*
Grab your pencil or marker and let’s get started – by the end of this tutorial, you’ll have mastered the art of drawing one of nature’s most fascinating creatures. Don’t forget to grab our handy printable version too!
How to Draw Snake Step by Step

What you need:
Step by Step Snake Drawing Instructions
Step 1
Start by drawing a pair of eyes. Two circles side by side (touching, overlapping, or slightly apart, all works out well), and draw a dot inside each circle. Eyes are done!

Step 2
Next, draw the forehead with two curved lines above the eyes. Draw a small arc above the left eye, then draw another small arc above the right eye. These curved lines will create a nice forehead area and give your character a friendly look!

Step 3
Next, draw the lower part of the face by connecting the sides of the forehead down to create the cheeks and chin. Start from one side of the forehead, curve down and around to form a rounded chin, then curve back up to connect to the other side of the forehead.

Step 4
Draw the mouth and nostrils to bring your character to life! Draw a curved smile line for the mouth, then add two small dots above it for the nostrils.

Step 5
Add a forked tongue, draw two small curved lines coming out from the bottom of the mouth, then add a little “V” shape at the tip to create the classic snake tongue.

Step 6
Next, draw the snake’s body by adding a long, curvy line that starts from the bottom of the head. Make it curve like the letter “S”.

Step 7
Add a curved line that connects to the end of your “S” shape.

Step 8
Next, give your snake a proper body by drawing the other side! Add a curved line that follows the same shape as your first line, creating the full width of the snake’s body. This will make your snake look nice and rounded instead of just a thin line.

Step 9
Next, finish the snake’s tail by completing the body outline at the end. Draw curved lines to close off the tail, making it nice and rounded. Now your snake has a complete body from head to tail – perfect!

Step 10
Next, add some fun patterns to make your snake extra special! Draw curved lines and shapes all along the snake’s body to create a colorful pattern. You can add spots, stripes, or any design you like – this is where you can really let your creativity shine and make your snake unique!

Step 11
All done! You’ve learned how to draw a snake. Now it’s time to color! Choose your favorite colors to bring your slithery friend to life. You could use green like this one, or pick any colors you love. Maybe bright purple, sunny yellow, or even rainbow colors! Color the head, body, and all those fun patterns you drew.

And there you have it – your very own adorable snake drawing is complete and ready to show off!

Get the Snake Guided Drawing Printable
The printable drawing guide is available to members of the Easy Peasy and Fun membership.
To access the template, log in to your account or become a member.
Already a member? Log in here.
Want instant access to all of our printable crafts, activities, and resources?

With thousands of crafts, activities, worksheets, coloring pages, and drawing tutorials to print, you will always have just the resource you need at your disposal. Perfect for parents and teachers alike!