An art show organized in a preschool is a good option to remember creativity, as well as give a bond between family and classroom learning. Within the month, the students will get a chance to examine the art of popular artists and make their own out of their original styles. With ten or more projects on display, like water lilies based on Monet or self-portraits using the style of Frida Kahlo it becomes a colorful gallery in the classroom. Another opportunity that this event can provide is an opportunity to handle families a chance to bond with preschool staff members, get acquainted with other students, and have a beautiful preschool art show.
To give it the real art show appeals, have it as a complete after school event. Request invitations, offer light refreshments and a classical music in the background. It could also have a carnival flavor, immediately after school, and have a party atmosphere.
Setting Up the Preschool Art Show
A key component of an art show in preschool is a chance to display student art so it is worthwhile work, and when done with a thoughtful eye it is a breeze to show a piece of the creativity of each child. Consider these helpful tips:
- Think about how each piece should be displayed? Is it required to be hung, hung on a string or on a shelf?
- Make sure that each item fits in a size that accommodates the work by each artist.
- Organize the area the natural way that has to offer the adults free movements during the show. If a particular route works best, mark it clearly for families.
- Create a “Meet the Artist” tag for each child. This can include a photo of their favorite piece they’ve created, along with a short sentence or two about themselves.
- Display the inspiration for each creation alongside the student artwork. Families and friends love seeing what inspired their young artist!


Display Ideas to Try
Each classroom space is different, but here are a few display styles that work well and pair beautifully with the materials in the Famous Artists Unit:
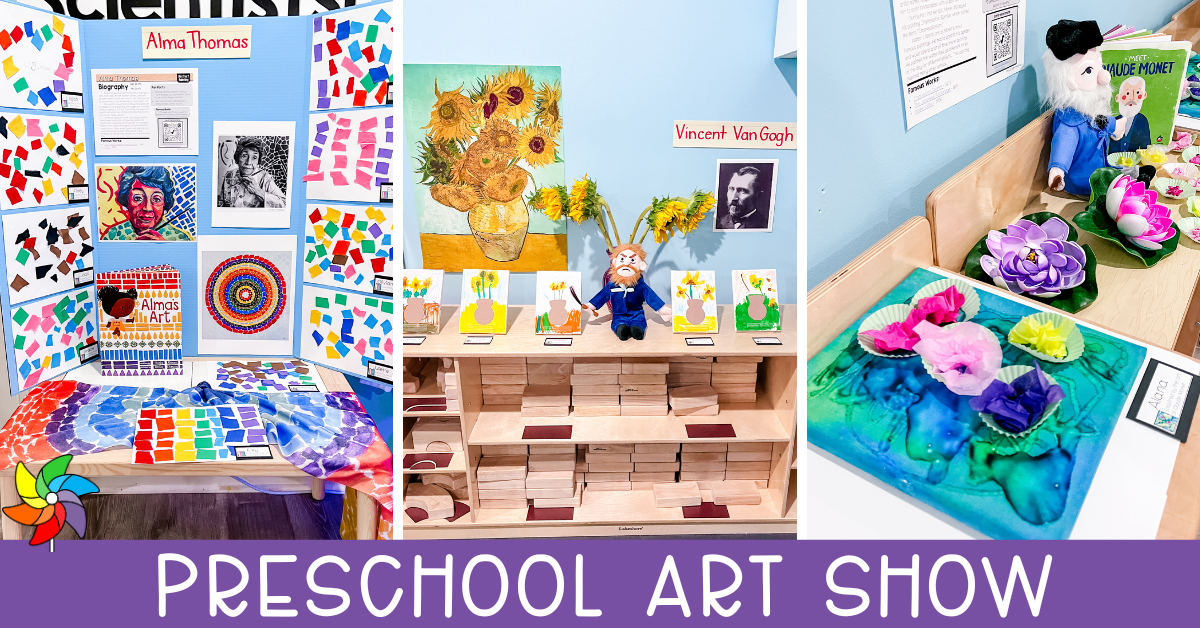
Trifold Boards

Set up a trifold board on a table to create an artist station. Include an artist biography and inspiration photos or pictures. Lay the students’ artwork on the table for visitors to observe.
Shelf Displays

Use a low shelf to create an inviting gallery space at eye level for young children. Line up student artwork on display stands and include a museum-style card with the child’s name and title of the work.
Wall Displays

Hang artwork on bulletin boards or a blank wall using painter’s tape or clothespins on twine. Include a printed copy of the artist bio and a small photo reference of the original inspiration nearby.
All of these formats can be mixed and matched depending on your space. What matters most is making each student feel seen and celebrated.
- And if families ask where the adorable artist dolls came from, they’re called Little Thinkers Dolls from the Unemployed Philosophers Guild. They’re available online and make a great addition to any art-themed classroom.
Preschool Art Show – Creating The Art
Any preschool art show can not be complete without the process of art creation. Introduction to renowned artists helps children to discover the new materials, to spot details in things appearing around them and to share their own thoughts in a very individual way. With the assistance of a unit such as the Famous Artists, it is now easy to expose the student to different artists and techniques so that every child gains confidence and creativity on their way towards the main event.
Water Lilies Art inspired by Claude Monet

Supplies:
- canvas (1 per student)
- watercolors
- paintbrushes
- tissue paper
- clear glue
- green cupcake liners
- tissue paper
Begin by looking at photos of Monet’s water lily paintings. Display pictures around the room and introduce the students to his work by reading a book such as Meet Claude Monet by Read with You Center of Excellence. Provide every child with a white canvas that has been painted on with blue and green watercolor paint and ask children to apply blue and green watercolor artists to produce the appearance of water. Students may add some clear glue to their painting by sprinkling it on the wet paint and it will give the painting even more of a real-life effect. Allow the paintings to dry overnight. Once dry, students can glue down green cupcake liners to mimic the look of lily pads on the water. On top of each liner, a colorful piece of tissue paper can be added to bring color to the flowers in the lily pads.


Abstract Clay Faces inspired by Picasso
Supplies:
- Crayola Model Magic
- Rolling pins
- Paper plates (1 per student)
- Picasso face posters or photo references


Challenge students to make surrealistic faces out of colorful Model Magic clay like the fantastic portraits of Pablo Picasso. Present every child with a paper plate and a choice of clay of various colors. They are able to roll the clay as balls, pinch it to make shapes, or even press it, making forms of the face such as eyes, noses, and mouths and hair. Tell them to have some fun with the placement. Some children may stack pieces or place features in surprising spots. The next day, display the finished pieces to celebrate each child’s unique interpretation of abstract art.
Colorful Collages inspired by Alma Thomas

Supplies:
- Colorful paper strips (construction paper or tissue paper)
- Glue sticks
- Large white paper or cardstock
Begin by providing students with several scraps of colored paper in the form of strips and demonstrating the way to tear the pieces to small shapes. This ripping of paper is fantastic to develop coordination and strength of their hands. After their pieces are prepared students may assemble and glue them onto a full-sized paper so as to make abstract designs. Others may opt to form the lines or circle patterns whereas some may overlay patches.


Vincent Van Gogh Sunflowers

Supplies:
- Brown cardstock
(precut into vase shapes) - Mini canvases
- Markers
- Crayons
- Glue
- Real sunflower blooms
(optional for observation)
Offer students the chance to create a mixed-media art piece inspired by Van Gogh’s famous sunflower paintings. Begin by gluing a cardstock vase onto a mini canvas. Encourage children to paint sunflowers on top of the vase with the help of real flowers around, should they be provided. Once they have drawn the flowers, invite them to use crayons to add detail, and in the background. To finish it, create a second cardstock vase to place on top of the artwork to make it look like an art. A drawing, color and creativity will be all unique combinations of each child.


Vincent Van Gogh Starry Night

Supplies:
- Black canvas boards
or heavy black paper - Yellow, blue, and green paint
- Paintbrushes
- Plastic forks
- Paint trays
Prepare the exploration with an atmosphere of creativity with a painting of a night sky (based on The Starry Night by Van Gogh). Give the students black canvas or paper and a set of yellow, blue and green paint to do so. Ask them to fill the surface with strong brush strokes mixing colors, as they proceed. As the paint is still wet, demonstrate and explain use of a plastic fork to create texture and swirling marks. This was the technique that resembles the motion over Van Gogh well recognized sky. As each child experiments with tools and color, they create a unique version full of energy and imagination.


Yayoi Kusama Polka Dot Letters

Supplies:
- 3D paper mache letters
(beginning initial of each
student’s name) - Paint in various colors
- Colored dot stickers
- Glue
- Mod Podge
Start the project by giving each child a paper Mache letter that matches the first letter of their name. First, students paint their letter. After the paint dries, they decorate it with colorful dot stickers. Some place the dots in neat patterns, while others fill every space with color. Both approaches are great. Apply layer of Mod Podge to seal it all in. These are bright polka-dotted letters, marvelously designed and have a special collection value.


Wassily Kandinsky Concentric Circles

Supplies:
- Circle cutouts
(wood, cardboard, or card stock) - Kwik Stix paint sticks
- Ribbon or string
- Hot glue gun (for teacher use only)
Children love working with bright colors, and this simple circle project gives them a fun way to explore abstract art. Using Kwik Stix, students fill in their circle cutouts with layers of color, starting from the center and moving outward. Some may work in neat rings while others blend and overlap shades in bold, expressive ways. Since the paint dries instantly, there’s no waiting before finishing. Once complete, a loop of ribbon or string can be added to the back using hot glue. These colorful circles make a striking display and are easy for young artists to create with confidence.


Primary Color Boxes inspired by Piet Mondrian

Supplies:
- clear glue
- green cupcake liners
- tissue paper
- canvas (1 per student)
- watercolors
- paintbrushes
- tissue paper
Transform simple cardboard boxes into bold, colorful sculptures inspired by Piet Mondrian’s abstract art. First, wrap the boxes with white butcher paper. You can use ruling device and black marker to construct a grid of straight lines and you can end up with a combination of rectangles and squares. Red, blue, and yellow paint are then used to Fill the shapes as part of the choice of youngsters. Others might scpropositionuffaga crapic rather tentatively one square at a time, and others might be interested in trying to integrate, or pattern. After paint dries, place lines with strips of black tape giving details a finished appearance to each block. These colorful 3D crafts would be great to display or could be added to the block center where students could continue playing with it.


Pop Art Handprints inspired by Andy Warhol

Supplies:
- Biocolor paint
in black, white, and bright colors - Sturdy white paper
(cut into 5.5-inch squares) - Old gift cards or plastic scrapers
- 12×12 cardstock
- Art smocks
This colorful project introduces young artists to the bold style of pop art. Each child begins by choosing one bright color of Biocolor paint. They rub it on their hands and press a handprint onto a white paper square. The magic happens right away. Without letting the paint dry, students add a second color. A small line of paint is placed at the edge of the square. Using a plastic card, they scrape the new color across the handprint. The handprint stays visible, and the background fills with texture. Four prints are made after which the squares are pasted on an ultimately black or white card stock. This produces an intense graphical art piece that stands out on the wall.


Frida Kahlo Self-Portraits

This easy portrait exercise is part self expression together with the use of vivid color, similar to that of the work of Frida Kahlo. First, print in black-and-white a photo of each individual student with their face in clearly visible and forward facing orientation. Place bright acrylic coloured paints and a small brush. Demonstrate the possibility to add color to the background, clothes, and hair and not to paint the face. Not all children stop painting their faces and that is fine. Artists do a self-selection. The students are able to perform flowers, pattern, or any other colorful addition. Allow the portraits to dry, and then present the portraits in plain frames.


Packing Up:
What to do when the
Preschool Art Show is Over


After the event, gathering student artwork can be straightforward with a little planning. Set up a designated space for each child. As you take down the displays, add each piece to the correct spot. After everything is in order, put the collection into a paper grocery bag with the childs name on it. Families will love going home with a bundle of artistic handmade artwork made by their child under the muse of famous artists.
As far as the educational materials, clear totes with snap-tight lids work well for keeping the resources clean and ready to go for the next time a preschool art show is on the calendar. Stored one artist per bin makes it easy to mix and match as needed.
More Than Just an Art Show
A preschool art show highlights the creative work students have explored over time. It gives families a window into the classroom experience and the artists their children have learned about. Whether in colorful paintings or imaginative sculptures, all the creations are evidence of how much learning and the growth of confidence there is in the hands. The preparation and simple materials used make the art show an exercise of effort, interest and creativity. It is also a good method of ending a unit and unites the school community.